Posted by Mandy
 One of my favorite skirts to make is the Peek-A-Boo skirt because it is so easy. I mean 4 rectangles, some ribbon, 20 minutes and whalla, you have an adorable skirt. This "how to" might not be detailed enough for the beginning sewer so if you find yourself lost you can buy step by step instructions off etsy. Good luck and I hope you love it as much as I do.
Size Chart - all measurements are in inches.

Cut all pieces as instructed above.
Finish the top and bottom edges of the waistband, top layer, and bottom layer of fabric. Finish all four sides of the drawstring fabric. In the photo below I have used a red dotted line to show my serged edges.
 |
I finish all of my edges using a serger. If you do not have a serger you can simply use a Zig Zag stitch. |
I have a rolled hem foot for my machine which makes the next step a breeze.
Sew a clean edge to the bottom edge of the Top Layer and Bottom Layer fabric. If you do not have this type of foot you can fold the edge under and iron down the material to make a clean edge. Then top stitch the edge down.
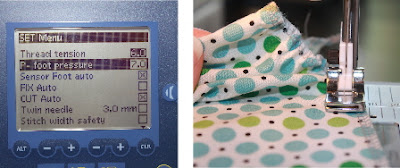
The next step is to simply gather the top edge of the Top fabric and Bottom fabric. For this skirt I used my Gathering Foot, but for larger skirts it is easier to use a Pleating or Ruffling foot. I set my thread tension to 6 and Pressure Foot Pressure at 7.
Here is what all of my pieces look like after this step.
Next sew the Top layer and Bottom layer together by placing the wrong side of the Top layer on top of the right side of the Bottom layer. Sew using a straight stitch across the top.
top left picture below
Then layout the skirt (top left) fold it in half and place the drawsting fabric where you would like ribbon to go. Mark this spot under the top layer of fabric (top right). Place the drawstring fabric under the top layer and sew three lines (bottom left). The red lines indicate sewing path. Feed the ribbon up one side and down the other. I attach a safety pin to the end of my ribbon to make it easier to pull through (bottom right).
It is now ready to sew the waistband on. With right sides together sew the waistband to the skirt.
Take the time now to clean up any loose threads. Fold the top of the waist band around and sew it to the back of the skirt, hiding all top edges of the skirt. Sew down using a straight stitch.
Feed elastic through the waistband using a safety pin.
Once pulled through, sew zig zag stitch through both pieces of elastic to hold them together. Then sew the waistband closed.
No begin sewing the sides together by starting with the top layer. With right sides together sew a straight stitch down the edge of the Top layer (left). Then sew the Bottom layer the same way (right).
Clean up any remaining threads and you are finished. I paired this skirt with a reverse scotty dog applique I got from Planet Applique.


No comments:
Post a Comment